Troubleshooting AirBuddy installation issues
AirBuddy runs a background helper to keep device information and widgets up to date, respond to keyboard shortcuts, and display the Action HUD. AirBuddy installs and manages this component when Enable and launch at login is turned on.
Install the latest release in the Applications folder
- Download the latest release from the AirBuddy website.
- Open the disk image.
- Drag AirBuddy to the Applications folder.
- Open AirBuddy from the Applications folder and complete the setup assistant.
Don’t run AirBuddy from the Downloads folder or from inside its disk image. If more than one copy is installed, quit AirBuddy and use Spotlight to locate and remove the extra copies.
Make sure AirBuddy is enabled
Open AirBuddy settings, select General, then make sure Enable and launch at login is on.
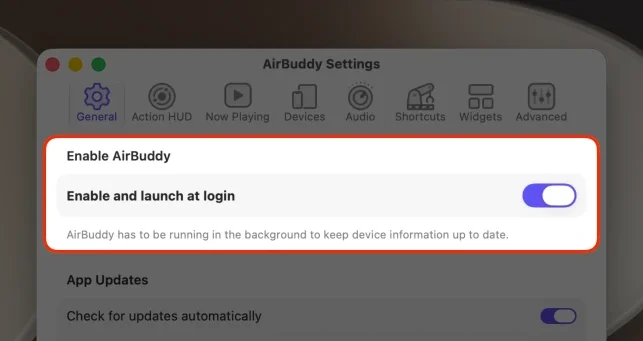
AirBuddy manages its own login item. Don’t add another copy manually.
Allow AirBuddy to run in the background
- Open System Settings.
- Choose General > Login Items & Extensions.
- In Allow in the Background, make sure AirBuddy is allowed.
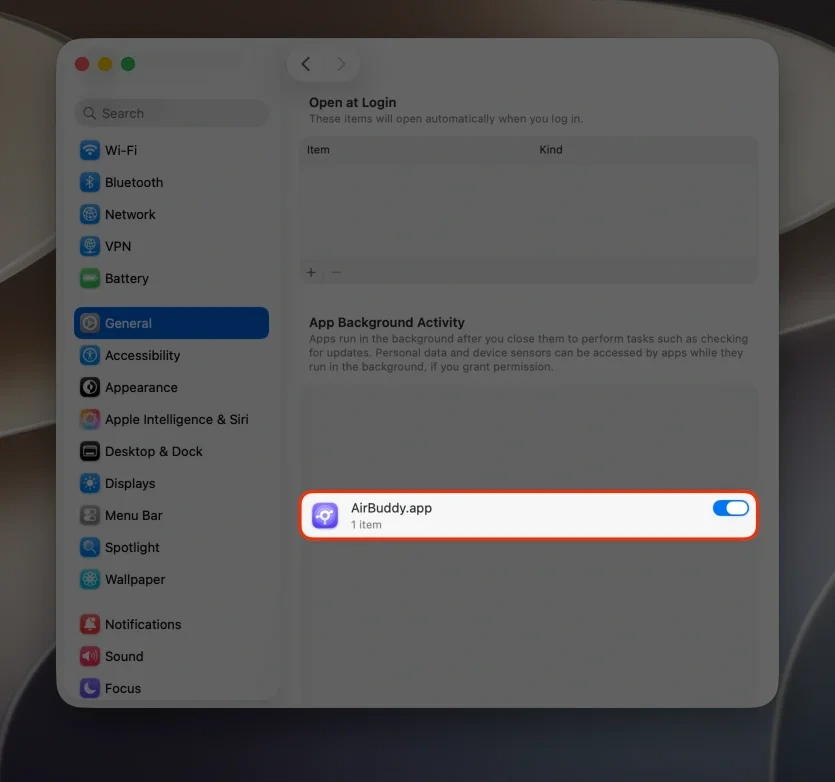
The exact item name can vary between versions of macOS. If an older AirBuddy item remains after an update, restart the Mac before changing it.
Check the helper in Activity Monitor
Open Activity Monitor from the Utilities folder in the Applications folder, then search for AirBuddy. When AirBuddy is enabled, its background process should appear even when the settings window is closed.
If it doesn’t appear:
- Turn off Enable and launch at login in AirBuddy settings.
- Quit AirBuddy.
- Restart the Mac.
- Open AirBuddy from the Applications folder.
- Turn Enable and launch at login on again.
Reinstall AirBuddy
If the helper still doesn’t start, use AirBuddy’s uninstall assistant before reinstalling:
- Open AirBuddy settings and select Advanced.
- Click Uninstall.
- Choose Basic Uninstall so your settings and license activation are preserved.
- Download and install a fresh copy of AirBuddy.
See How to uninstall AirBuddy for details about the uninstall options.
Reset the background-items database
Use this final step only if macOS continues to reject AirBuddy’s background item after reinstalling. The command resets the background-item approval state for all apps, so macOS may ask you to approve other background items again.
- Open Terminal from the Utilities folder in the Applications folder.
- Enter
sudo sfltool resetbtm, then press Return. - Enter the administrator password when prompted.
- Restart the Mac.
- Open AirBuddy from the Applications folder and turn on Enable and launch at login.
If installation still fails, choose Help > Send Feedback in AirBuddy and include diagnostics with the report.